Showing posts with label Home / DIY. Show all posts

Sunday, March 29, 2020

Easy Washable Face Masks

Hi everyone! It's been a while since I last posted anything. Things has kind of gotten hectic and crazy for most of us in the last couple of days - weeks - months. I've been doing a lot of rest aside from the national home quarantine that is being ruled in my country (well that, aside from I am still under treatment but will reserve that blog entry in the coming months - fingers crossed this pandemic is cleared by then). Here's to praying that you are all safe and sound and staying away from crowded places and following the regulations your country is implementing (it's for our own good).

Anyway, the purpose of this entry to help out anyone who wants to create their own surgical washable face masks - given that the non washable is on scarcity due to the impending spread of the CoVid19. I saw this tutorial on youtube with no sew masks but since I own a sewing machine, I decided to recreate mine with the aid of the machine. Will post photos, so it's easier to understand. Hope, this helps those who needs to own one. Goodluck!
Materials: Cotton Fabric, Bird's Eye Fabric, Garter Bands, Pins, Scissors, Threads, Surgical Masks, Pen and Paper. Sewing Machine (optional)
Step 1: Fold the surgical mask in half as seen on above photos, making sure that it's on full stretch to ensure the perfect fit. Trace the edges on paper as what I did and cut. The pattern should look like on the second photo when opened.
Step 2: Using the pattern you cut, place it on your cotton fabric and bird's eye fabric and trace the edges, making sure you give a half an inch allowance for folding and sewing - later on. Cut traced fabrics and prepare for sewing.
Step 3:  since this is a customised masks, the garter bands depends on how loose or tight you want it to be or for whom you're making it. The sizes of my garter bands are 9.5inches for me and my father and 8.5inches for me mother (since she has a smaller face)
Step 4: now that you've traced and cut the fabrics, it's time to sew. What you do is group them into two. A pair of the cotton fabric and bird's eye fabric will be sewn together and the remaining cotton fabric. You will have to sew on the inside of the fabric, making sure the bird's eye is on the outer layer as seen on the photo above. Sew straight on the edge keeping in mind the half an inch allowance (sorry I forgot to trace it on the fabrics but follow red arrows). After sewing the center of each fabrics, sew them together as seen on below photo.

This is how it's going to look like on both center of the grouped fabrics. Sew the edges as you have traced the pattern.
Step 5: Turn sewn fabric inside out and using a pin, fold and pin each sides as seen on photo and adjust your garter band to your desire size. Sew together.
Finish Product

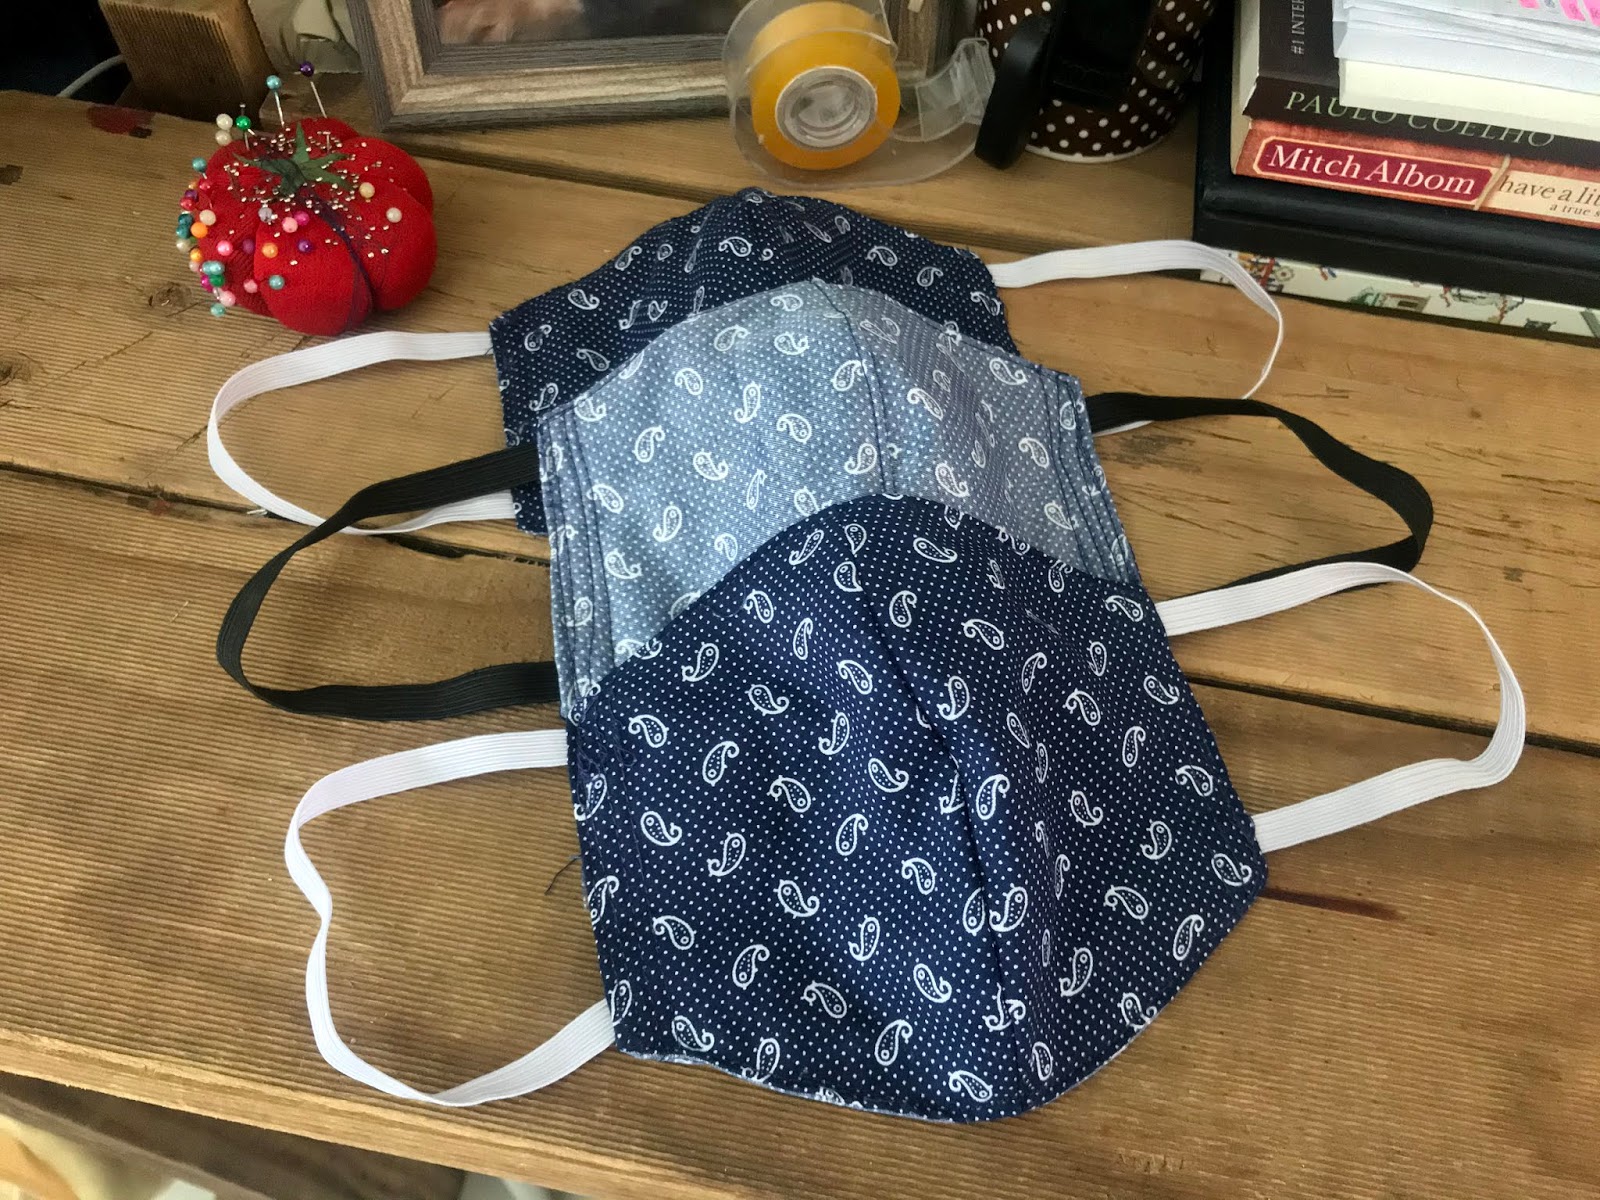
For this project. I used 2 meters of Bird's eye fabric. 1 1/2 meters Cotton Fabric. These materials made a total of 18 facial masks.

There are a few glitches on how I wrote the instructions but I hope that I was able to give justice to how I made these washable face masks. Should you have any questions, I wouldn't mind answering them, just hit me a message on here. Happy weekend all!

Friday, March 9, 2018

Pre Summer Projects

Sunny greetings from sunny Philippines. I hate to break it down to my friends in other countries but I think summer has officially started in this part of the world. Though, there are a little rain once in a while, still the sun gets up early at around 6am and sets at around 6pm. 

Anyway, the purpose of this post is to showcase my skills in DIY projects - A few weeks ago, I got obsessed with the idea of tassel earrings for my civil wedding thus, I decided to check out the ever reliable Pinterest for ideas and procedures and before I knew it, I ended making almost 8 pairs of tassel earrings including the one I want to wear for the special day but only posted 3 of the ones I think are summery in theme. 

Also, months ago before I left for Holland, I started crocheting a bag which back then I did hope to finish and bring with me but failed. During that time, what I had in mind was a bucket bag but 2 weeks ago when I was almost done with it, I decided to switch the design and ended with something way more cuter. This bag is also special because most of its materials were recycled reused, from the bag lining, threads and zipper. 

I've always said that Autumn and Winter and my favourite season but I can't hide the fact that I love the colours of Spring and the freedom that Summer brings. Sharing below a flat lay photograph I took earlier.

Summer ready though I am in house arrest for the time being :D 
While still finishing the straps for the bag.
That time I started with the tassel earrings.

It was fun to do all of these DIY projects. Sometimes, I'm surprised to know that I have this creative side in me, I hope I can earn a living from all of these :D 

Tuesday, August 23, 2016

DIY: Off Shoulder

I have a confess to make... for a long while, I have always dreamt of wearing and owning an off shoulder top. Being a plus size makes it a bit hard to find that perfect fit. A few stores had sizes for the summer that passed but I have to admit, most of them are a bit pricey. 

A few months ago, I started browsing through Pinterest for some DIY ideas when I came across a posting on DIY Off Shoulder top which was so easy to make and I decided to save that site (which I have to admit is too blog inspiring). And today, I finally took a step to achieve that personalised top I've been dreaming of. But I have to do a disclaimer for the photo quality. I will try to post an updated one, once I wear the piece in public.

Step 1. You have to have fabrics in order to make this DIY. The ones I'm using are scrap fabrics from my other DIYs. You also need to have the elastic fabric bond. A pair of scissors, threads, pins and sewing machine.

Step 2. Since this is a super easy DIY, your patterns could either be square for the sleeves and rectangular for the body but could also be like what I did, all rectangular to have longer sleeves. Make sure to pin only about 11 inches for the upper body (shoulder) and sleeve pattern. See photo below. Stitch the remaining sides for both sleeves and body pattern and don't forget to mark the length, so you'll know where to stop in attaching the sleeves.

Step 3. Then start stitching. I started with the pinned part of the sleeves and body pattern before doing the sides for both sleeves and body pattern. Finish it off by sewing the hems.

Step 4.  For the elastic fabric bond, stitch the shoulder hems but leaving an inch or more opening for the elastic fabric bond to go in. Use a chopstick for easier grip.

And viola!
I've never been more happier. If I have time to check out the textile section this weekend, I'll get some fabrics and make another one. I hope this post, made your day and would be inspired to create something fun. If there are questions about this, feel free to leave a comment. Thanks!

Thursday, August 18, 2016

Canvas Ropes

Canvas fabrics, recycled glasses and so on and so forth and then there's cotton canvas ropes. I don't know about you but the idea and the sight of it, always makes me giddy. I remember the first time I saw it on a stand inside a hardware and itching my hands to grab one and buy but it was too expensive for a rope thus, the dream disappeared - only to reappear at a dollar Japanese store that I always visit whenever I have time. And so my cotton rope dreams came to a reality. 

Now, this is a cotton rope which has a lot of uses. It could be use as a bag handle and other uses that could be both for home or another crafty - DIY. The garden rope is another personal favourite which is really hard to find around in Cebu and which is really nice to use as ribbon for almost anything.

For this DIY, I will be showing you how to reuse semi cracked drinking glasses and turn it into a vase. Check the photo below to see what you need which you can easily find at home.
Cotton Rope
Cracked Drinking Glass (or any re useable glass ware)
Scissors
Glue Gun and Glue Stick

Basically, what you have to do is wrap the glass with  the rope. Starting from the bottom going up in a spiral movement but making sure there are no spaces in between each level. I wish, I could have taken a photo of the process but I forgot but I think we can all get the idea by looking at the images. Make sure to glue the rope correctly and neatly. Finish it by tying a garden rope around your vase.


Isn't it a beautiful sight? I did this DIY a few months ago, I think at the start of Spring and I've always loved the photo. So, try it out and enjoy! :)

Saturday, November 2, 2013

Neck Pieces

So what I've been busy with lately? These ones :D Been recreating a neck piece that I bought from Manila a few months back and after a handful of attempts, finally got the process but of course with my own twist for the product. Each necklace except for the one above is consists of 24 strands of beads in different lengths. The upper back part is stitched individually and is a time consuming effort shit work to do but when you see your finish product - it's just stunning as seen on photos 1 and 2. The photo above is for my good friend Kathy for her Halloween party at work. It's just six layers because it's rush work but it turned out to be pretty :D For this neck piece, I did it overnight but for the first and second photo, it takes one week straight 5 hours a day of labor to finish. I'm currently making Katherine's order of Black and Yellow while waiting for my "Pilipinas" skull head shirt to dry. Work is going well - not really work but just hobby. :) Have a good weekend everyone! :)

Saturday, October 12, 2013

Lace and Gem that iPhone casing

1. You will need
*laced fabrtic (cheap ones used as curtains sold for less than a dollar)
*instant glue
*scissors
*gems
*old mobile casing

2 - 3. Apply some instant glue on the mobile casing and attach laced fabric. Repeat the same for the second layer of fabric. Let dry for a few minutes.

4. Once dry, cut edges using a pair of scissors as seen on photo.

5 -6. Align your gems according to the design of your choice. Apply instant glue on each gem making sure to place them individually on the casing.

7. Finish product :)

Happy weekend! :)

Friday, October 11, 2013

Sponge it Nail Art

Let's do some sponge nail art :)

1. You will need
*sponge (an inch in cut)
*clean paper
*two different nail polish colours
*colorless nail polish

2. Apply two coats of  your lighter shade nail polish as seen on photo. Let dry for a minute by cleaning the sides using cotton and nail polish remover.

3. On your clean paper, add two to three drops of your darker shade nail polish.

4. Dap your sponger - making small strokes as if mixing a paint.

5. Dap sponge on your coloured nails. Let dry and add colourless nail polish.

6. Done :)


You can also use other colours depending on how you want your nails to look. Happy Friday! :)

Wednesday, July 24, 2013

Five Skull Challenge

I know, I haven't written much entry in the passed couple of days unlike before. Well, I've been a bit busy doing something, that I never thought I was capable of doing. 

I'm not really a fan of skull but one man who's important in my life has this huge fascination over it and you could randomly say, that he's an inspiration for it but mostly, it was out of boredom. Ideas and colours just pops out of my head from nowhere and it's exciting and though it's not the best hand painting job one will see but I am proud of it. At least, I've found a way to kill my boredom at home and to express my emotions through the textures  that I mixed and to the strokes of my hands. I don't know if I'm capable of doing other designs aside from these skulls but everyday is a huge day, to challenge myself of all the other possibilities there is.

Here are my five skull challenge hand painting.
First Design :D
2nd Design. I was too overwhelmed when he made a comment on this design, that I literally ended destroying the good foundation that I started on the shirt but nonetheless, it turned out weird dirty crazy which channels my fascination for him.
3rd Design
4th Design
5th Design

And there they are! Hahaha I can't help but be proud of what I've done. The designs that I meant on this project is the shape of the skull. I'm not saying that they're all an original trace because they aren't. I googled some and eventually painted and they came out like this. 

I'm excited to make some for my friends. Hopefully they will pay for it. Hahaha I'm planning on doing some business for next year's Sinulog Festival but let's see how it goes first. I'm not sure how the fabric will react to the paint once washed or what-so-ever, so I'm just crossing my fingers that it's OK so I can push through with my plans :D

My first skull project is this one.
It's basically a DIY if you're into recycling old shirts like me. This is an old shirt with holes on the sides,  and since 'twas too boring to wear, I opted to paint something and came up with this :D Cut some portions of the sleeves, folded and stitched then WOOLAAH! :D

And here's my tool kit. :D Feeling much :D
I have paint brushes with 2 4 6 and 8 numbers. Pentel brushes has a fine finish when you're painting big portions and I have a favourite number 2 brush from China which I bought some years ago for outer tracing :D And assorted textile paint and I do mixes to get light blues, normal shade of green and other colours that I don't find in the shops :D Then I have a bag full of plain white shirts in different sizes. Just in case, someone would decide to order something :D Wee!

Monday, June 3, 2013

Tattered Denim Vest

Here's a DIY project that's totally easy as 1 2 3. Had been dying to do it for the longest time but laziness always gets the best of me but finally - today was the day.  Since I've decided to take hold of my life for the moment, I  finally did it :)
1. You will need
* Old Denim Vest (i got mine from a thrift shop in Manila some years ago)
* Scissors
* Paper Cutter
* Gems Buttons (or any buttons of your choice will do)
* Needles and Thread
2 - 3. First stop is to cut the sleeves as seen on the photo above.
1. To create the tattered effect, make sure that you have a used wooden board to use as base table once you start cutting.
2. Create slow to medium strokes on the fabric (up down up down, in this case had it diagonally but still same motion) until cutter cuts through. Repeat on the areas where you want to have the tattered effect.
1 -2 . In adding the buttons, make sure to have a preview of how you want it to look like. Alignment and stuff.
3. Thread your buttons as you want to place them on the fabric.
Finish Product :)

Fun, isn't it? Never leave me with a pair of scissors and some threads :D I'm really good at this - sometimes and it bothers me that my mother never thought of buying me a sewing machine. Maybe I will soon :D

You can also do this DIY with jeans and denim shorts. The strokes for the tattered effect sometimes depends on the thickness of the denim. For this one, I used medium stroking then I go fast and then slow. That sounded nasty but we're talking about clothing here - so shut your thoughts! :)

'Til next DIY :D

Wednesday, March 13, 2013

Laced Clothes Hanger

Materials
• Used Fabric
• Scissors
• Used/ Old Clothes Hanger
1. Cut your fabric into an inch size or it depends on how wide you want it to be. For easier cutting, I folded the textile before cutting as seen on the photo above.
2. Cover the clothes hanger starting from the handle, working your way 'round the entire hanger itself. To cover the handle, simple put the end in between the fabric then fold and start twisting your way until you covered all areas. Since the textile lengths are different, make sure to tie the knot once each piece reached an inch from the tip, as seen on the photo. PS, the knot makes it look like a design for each clothes hanger piece :)
To cover the bottom part of the handle, simple twist the fabric around as seen in the photos above. 
Finish Product :)

Hey yah! I think my instructions were a bit vague. Pardon me for taking such short cuts on it by using photos to explain what I'm too lazy to write down. This idea came out of nowhere, I was fixing my closet and I ran out of clothes hanger and browsing through the laundry area - all I got were pink plastic hangers thus I decided to take time and modify it with some old fabric that I have. 

I think that the idea is pretty neat and I'm not sure if there are other related DIYs like this on the web. It's fun to be able to customised your own stuff at home to suit your taste and style. For this, I think it's best to be using the wood clothes hanger because it'll look more fantastic but it's also good to be modifying old ones that are at hand because it's more budget friendly.

I hope that this DIY made your day, the way it made mine :) Took me 45 minutes to finish 10 pieces. Enjoy customising. PS, you can also add some name plate on each if you want to have it as his or hers or you can add some cute ribbons on the bottom of the handle.

Tuesday, February 5, 2013

DIY Wallpaper

Artsy? Bored? Creative? Magazines? Newspapers? 

Just about everything. I mean, I am not personally gifted with skills and brilliant ideas about home decors and stuff but I do love recreating - recycling shiz since I was in college and I have been so dreading to try diy magazine wallpapers. Had been thinking about it for some time but never really have an idea as to what to do after I've pasted all those glossy stuff on my wall so, this morning I decided to dig into the world of DIY Wallpapers and lo and behold - there are so much creative minds lurking all over the world but the two sites that I'll be posting here is a favourite and one blog is hitting on me like a personal choice of heroine. 
http://www.abeautifulmess.com/2013/01/diy-instax-wallpaper.html
 This is a real attraction and I would really want to do this project one day when I have my own place and living the dream of being a housewife. LOL I mean seriously it's the perfect creative idea for people like me who loves photography. The only problem about this project is that it is a little expensive  - keeping in mind the ink for printer and the photo papers but by and by if you really want to invest on a wonderful eye catching perky wall - this is my bet but putting into consideration the fact that I already have a wall almost full of framed photos, I decided to just admire this idea from a distant and hope I'd be able to pursue this later. 
There are also other DIY ideas on this blog site which I dig and it kinda made me think - what if  I start  recreating the ideas I have in mind into reality? but then again, I easily get bored with things but let's see how it goes. :)
http://fabgreen.com/2008/02/28/design-by-rescue-newsworthy-wallpaper/
Newspaper slash b&w prints was also in my mind when I wanted to push through with the idea for my open closet but for newspapers I don't really know if I'll like the smile of it in my room thus the magazine popped into full bloom consideration - MUST. I think this particular DIY is perfect for a couple room or later on when I become totally serious with life :D

Point is, no matter what choice you may have for these ideas I've posted, it all boils down to showing off one's creative side and appreciation for things that had been once used - recycling. And I am one heck of a recycler so :D I started my own project already but I lack some of the materials like additional double sided tape and the thing you use to like seal the papers intact (pardon me, I forgot the term). Will be updating if I get half way with it :) 

For now, enjoy being creative :)